2017 Update:Step by step video tutorial:
First thing you need to do is download the file which is most likely in a .zip. I suggest you save the .zip to your hardrive or "C:"
Once you downloaded the .zip, double click it and you should see a .rez file, a readme, and possibly some screenshots. If it does not open, you need to get winzip:
http://www.winzip.com to extract the rez.
If the file is in a rar format, you need to get winrar:
http://www.rarlab.com to extract the rez.
I personally recommend winrar, as it is free and it will open up both zip and rar file formats.
Make sure you have created a custom folder. If you haven't, Right Click>New>Folder. Name this new folder "Custom."
Now move the "Custom" folder into your C:\Program Files\Fox\Alien vs. Predator 2\ folder.
Then either extract the .rez file or copy the .rez file from the .zip and place it in the "Custom" folder you just made.
You just installed the Map/Mod/Skin.
To run the Map/Mod/Skin, start AVP2.exe
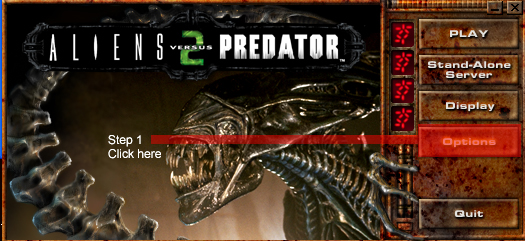
When the launcher appears, as seen in the screenshot below, click "Options."

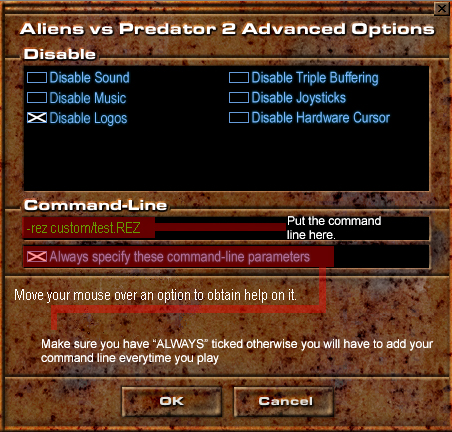
You should now see a text entry called "Command-Line."
Enter the following into the Command-Line -rez custom/______.rez
*Note: Do not put _____ but rather the file name of the rez.*
Also make sure you check the box that says "Always specify these command-line parameters"
See the screenshot below for further help.

Click "OK" and then "Play" on the launcher. The game will start and you should see either a new accessable map, or a mod or skin running.
To run multiple maps/mods/skins/ enter the following into the "Command-Line":
-rez custom/______.rez -rez custom/______.rez
As you can see there should be a space between the commands.
*Note: You can only run up to 8 different files at once.*
Also when running these files, make sure the "Command-Line" is in the order of maps, then mods, then skins, to ensure compatibility.
For example:
-rez custom/nameofmap.rez -rez custom/nameofmod.rez -rez custom/nameofskin.rez

